Updated: 19 February 2026
McKinsey Solve Games are complex, gamified assessments designed to test key consulting skills. Read on for expert tips to help you tackle the challenges and succeed in the assessment.
Tips for All McKinsey Games
The McKinsey games look and feel like games. They are very visually engaging, with rich graphics, pictures, and an interactive environment. Therefore, it may be easy to believe they are games, and forget that you are actually being assessed.
However, the McKinsey games assess a variety of skills. Keep these in mind as you navigate the tasks and make decisions during the game.
Some skills are common across all three assessments, while others are game-specific. For example, Ecosystem emphasizes systems thinking, whereas Redrock focuses more on data analysis and synthesis. Throughout this blog, we'll highlight the primary skills each game is designed to evaluate.
It’s important to remember that you don’t need to excel equally in every single skill. McKinsey uses multiple games to build a well-rounded profile of each candidate — identifying where you naturally perform best, how you approach different types of problems, and where there may be room for development.
Tips for the Ecosystem Game
In the Ecosystem Game you will be put in one of two environments – Mountain Range or Coral Reef. The game play is completely identical, besides differences in the species and parameters. You will have two game objectives.
- Select 8 species that can survive as an ecosystem.
- Choose the location for the ecosystem.
You will have 35 minutes to complete the assessment. It consists of 39 species – 30 animals and 9 producers – divided into three groups based on ranges of environmental conditions.
Let's dive into some key tips to pass the game with flying colors.
Main Skills
- Problem solving - Your goal is to solve the problem of building a sustainable ecosystem. To do this, you must consider many different variables, such as species interactions and environmental conditions, in order to reach the correct solution.
- Systems thinking - In the Ecosystem game, introducing or removing one species affects other species and the environment as a whole. This requires a systems-thinking approach, as you need to consider the whole system (the ecosystem), not just individual components.
- Trade-off analysis - Your task is to evaluate the species and decide which to prioritize. You must make choices about which species to add, which to remove, and when to make compromises, considering the trade-offs involved in each decision.
Get to Know the Parameters You're Working With
The parameters will appear in two places: the Monitors and the Species.
On the top right of your screen there will be monitors showing all the game parameters. Clicking on a monitor will display its details, which then update dynamically as you move your mouse across the screen.
- For example, as you can see in the image, clicking on Elevation shows its details, and then clicking on Temperature shows its details as well.
- You can have up to four parameters displayed at the same time.
The species will also have a list of parameters. A key tip for the game is noticing which monitor parameters are relevant for the species. You only need to focus on the parameters that appear both in the monitors and in the species’ profile.
For example, let's take a look at the Roe Deer from our simulation test:
Only Elevation range, Temperature range, Wind speed range, and Soil pH range are identical between the monitors and the species.
Once you notice this, you can immediately cut out some unnecessary noise and focus your attention on the relevant parameters that are common to both the monitors and the species. There may be less or more than four common parameters and they may have different names in the real assessment.
Choose a Group of Species
The 39 species in the game are divided into different location groups that differ by parameters. Some species may only be able to survive in an elevation range of 2001-4000 while others can only survive in a range of 0-2000.
For example, the Roe Deer belongs to the group that lives in the following range:
- Elevation range: 2001-4000 m
- Temperature range: 3-7 °C
- Wind Speed range: 10-30 knots
- Soil pH range: 5.5-8
This part can be tricky, since all four of these parameters define the location, so you must make sure they are all compatible across the 8 species you choose.
When choosing species for your ecosystem, it is crucial that all species come from the same location range. At the end of the game, you will select where your ecosystem will live. If your chosen species can't all live in the chosen location ranges, you will not be able to achieve a fully sustainable ecosystem in which all species survive. Therefore, keeping this in mind from the beginning of the game can help you save time later.
Build Your Ecosystem Wisely
At this point, you already have a group of animals from one of the location ranges. This group will usually include three producers and ten animals. It is recommended to add the producers automatically into your ecosystem, since they can be eaten but don't need to eat, which makes them easier to work with.
This leaves the need to choose five animals out of the ten animals in this range. Since all animals need to eat, it is usually wise to prioritize animals with higher 'Calories Provided' and, when possible, low 'Calories Needed'. Overall, you want the 'Calories Provided' in the ecosystem to exceed the 'Calories Needed', so keep this in mind while choosing your animals.
A helpful approach is to start with the animal with the highest 'Calories Provided', and then select the best option among its food sources (prioritizing high 'Calories Provided'), and continue this chain until you've chosen all five animals.
Finally, try to keep the food sources diverse. For example, try to avoid choosing three animals that all have the same producer as their food source. Spreading consumption across different producers and animals generally leads to a more stable ecosystem.
Learn the Algorithm
In the game, your goal is to build a sustainable ecosystem of eight species (producers and animals) so that as many species as possible survive. To do this, you are given eating rules according to which you must build the ecosystem.
Before you start adding species to the ecosystem, take a moment to carefully read and understand the rules at the beginning of the game. The game may be fast-paced, but rushing through rules can lead to misunderstandings that affect your entire ecosystem. If you misunderstand the logic at the beginning, it can throw off your calculations and impact your results later on.
We guide you step by step through the eating process in our PrepPack so you can fully understand how it works. As a small sneak peek, the illustration below shows part of the sequence — who eats first, how a food source is chosen, what happens to the calorie values, and who eats next. Understanding this flow is key to building a sustainable ecosystem.
Choose the Correct Location
Remember how earlier you chose a species from one location group? This means that all your species can survive within the same location parameters. This should make choosing the location range an easy task. In the game, you will be able to move your cursor across the screen, and the location parameters on the monitor will update dynamically according to where you are. Once you find a point that matches the location ranges of your species, you can select that location confidently.
Manage Your Time Correctly
You will have 35 minutes to complete the ecosystem game. Therefore, managing your time correctly is essential. During the game, you will need to choose a species group, build an ecosystem, and then check that the ecosystem is sustainable.
It is recommended to keep an eye on the clock and pace yourself, so you have time to adjust your ecosystem if the first one you built isn't sustainable. It is recommended that you try to leave at least half of your time for checking your ecosystems and making corrections.
Tips for the RedRock Game
In the RedRock Game, you will participate in a simulation designed to assess key consulting traits such as data analysis, critical thinking, and decision-making. The game includes a Study phase and a Cases phase, and you will have 35 minutes to complete it.
Let's dive into some key tips to succeed.
Main Skills
- Data Analysis - Along all stages of the RedRock game, you will analyze sets of data, including tables and graphs, to extract insights. This requires interpreting patterns, calculating values, and making sense of complex information to guide your decisions.
- Synthesis - The Redrock study builds gradually, from investigation to analysis to reporting. As you progress, you’ll continuously synthesize and integrate information, connecting various data points to form a comprehensive understanding of the situation.
- Strategic Planning - Since each stage builds on the previous one, you’ll need to make decisions with incomplete information during the research phase. You must decide on the most strategic approach, balancing the available data and anticipating what comes next.
Understand the Format
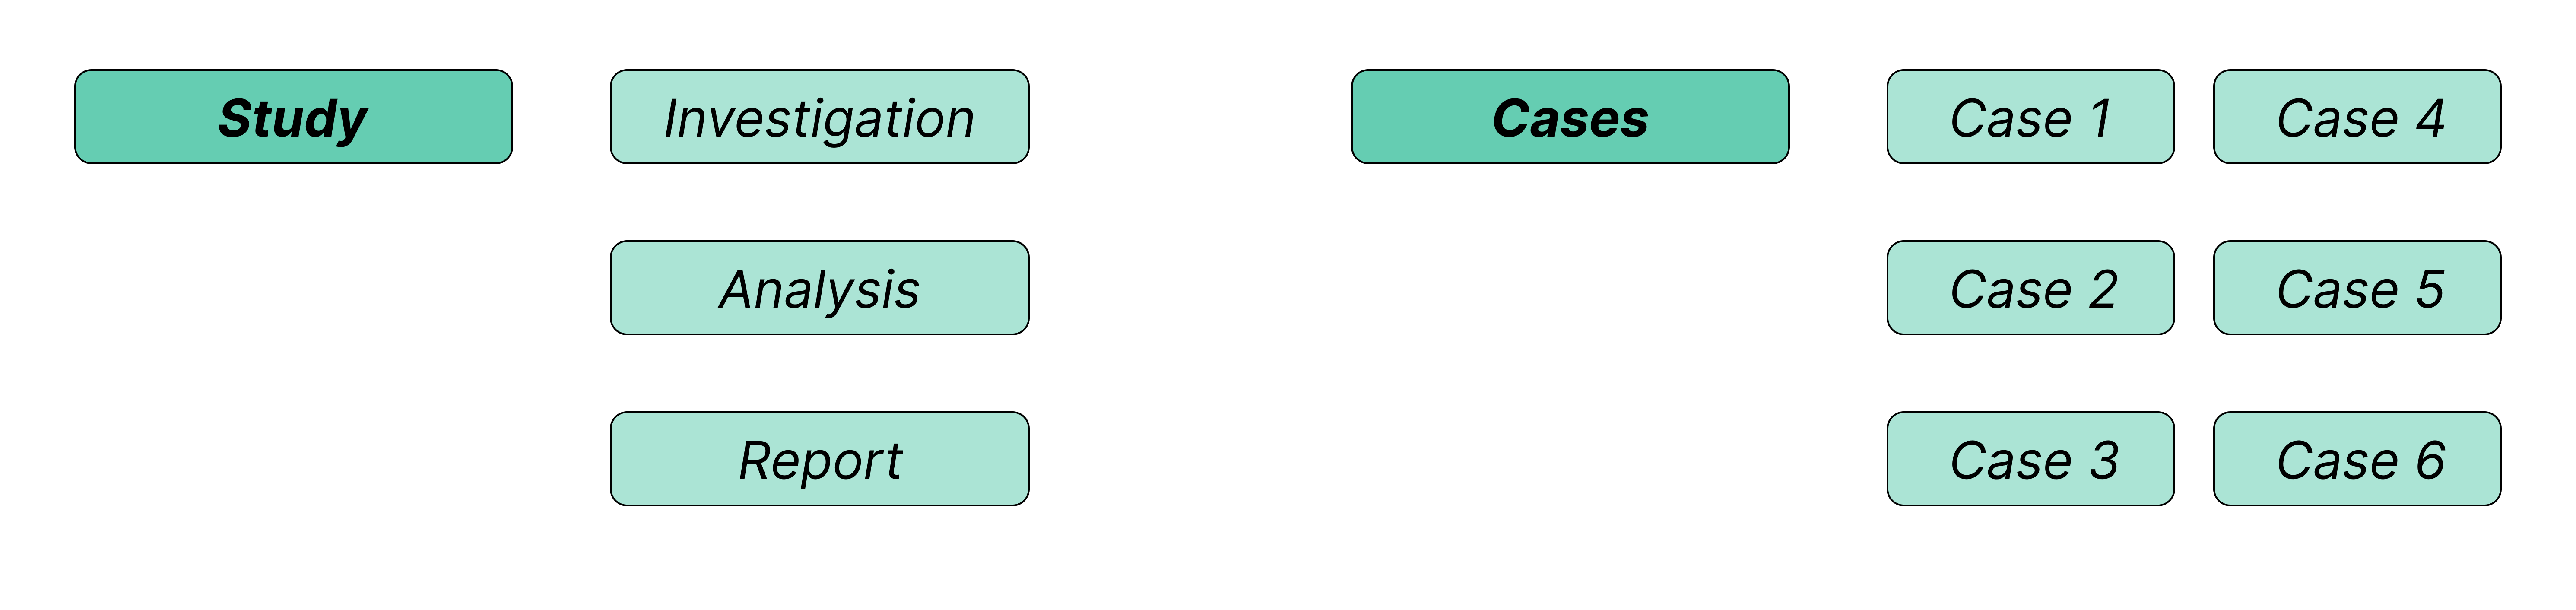
The RedRock game has several stages, and understanding them can help you plan your time, approach the test more strategically, and feel more confident. The game has two main stages, each with smaller parts inside it.
- Study – This is the main part of the RedRock game, and it includes three sections.
- Investigation
- Analysis
- Report
- Cases – This part includes a set number of independent cases, each with its own unique information and questions.
Treat the Investigation as the Information-Gathering Stage
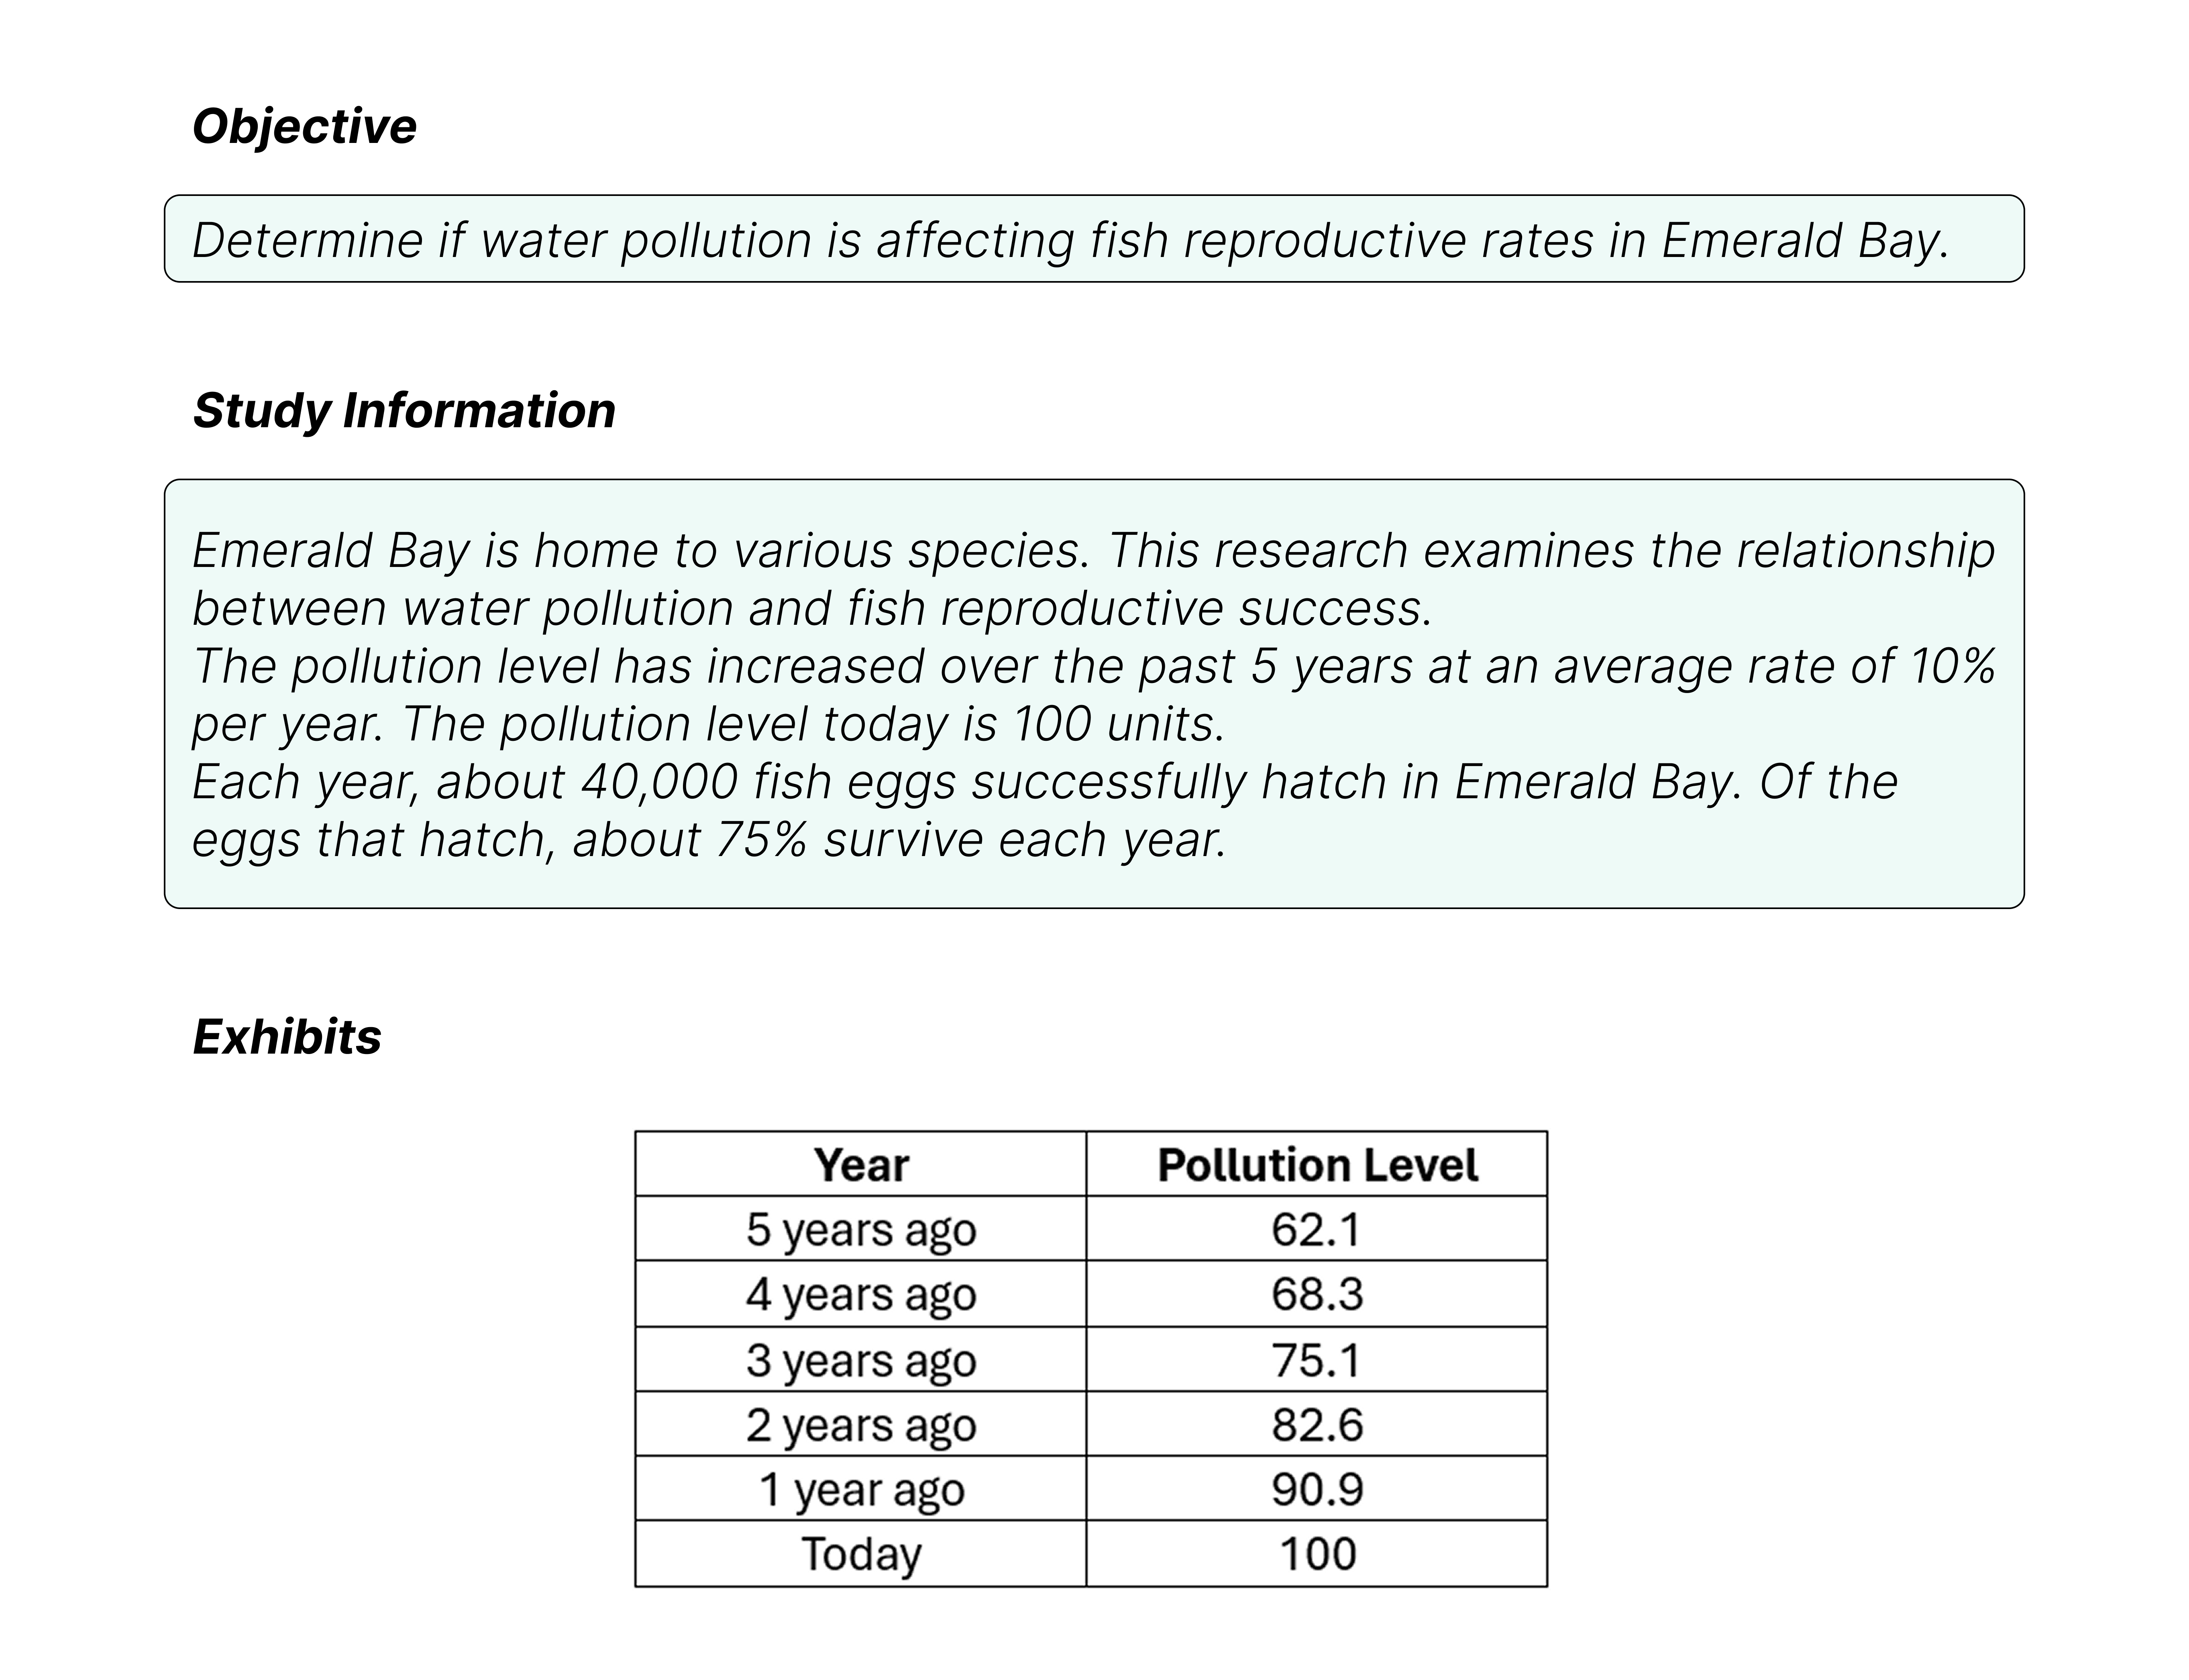
Most of the key details you will need later in the game come from this stage, so it's important to stay focused and read carefully. This stage includes three main information sources:
- Research Objective – This is the main objective of the research, and it is your main guideline for the game. Keep it in mind as you move forward so you're always connecting what you read and decide to the goal you're working toward, instead of collecting information without a clear purpose.
- Study Information – This is all the information included in the study. Some of it will be directly relevant to the research objective, and some of it won't. Your job is to identify what matters and what you'll actually need for later stages of the assessment.
- Exhibits – These are visual data sources such as graphs and tables that present the study information. Review them carefully as they often contain details that are important for answering questions later on.
The Investigation stage can look like the example below (this is a shorter version of what you’ll likely see in the real assessment, and you will see full examples in our PrepPack):
Keep the Objective in Mind and Collect Data Accordingly
As mentioned earlier, the study information will include data pieces that may or may not be relevant to your research objective. During this stage, you will have a Research Journal where you can save pieces of data to use later in the assessment.
A helpful strategy is to save data that is clearly relevant and try to refrain from adding data that isn’t relevant. With that said, if you're unsure whether something will be needed, it's usually better to save it anyway. Having an extra piece of information is often safer than realizing later that you're missing something important.
Get to Know the Research Journal
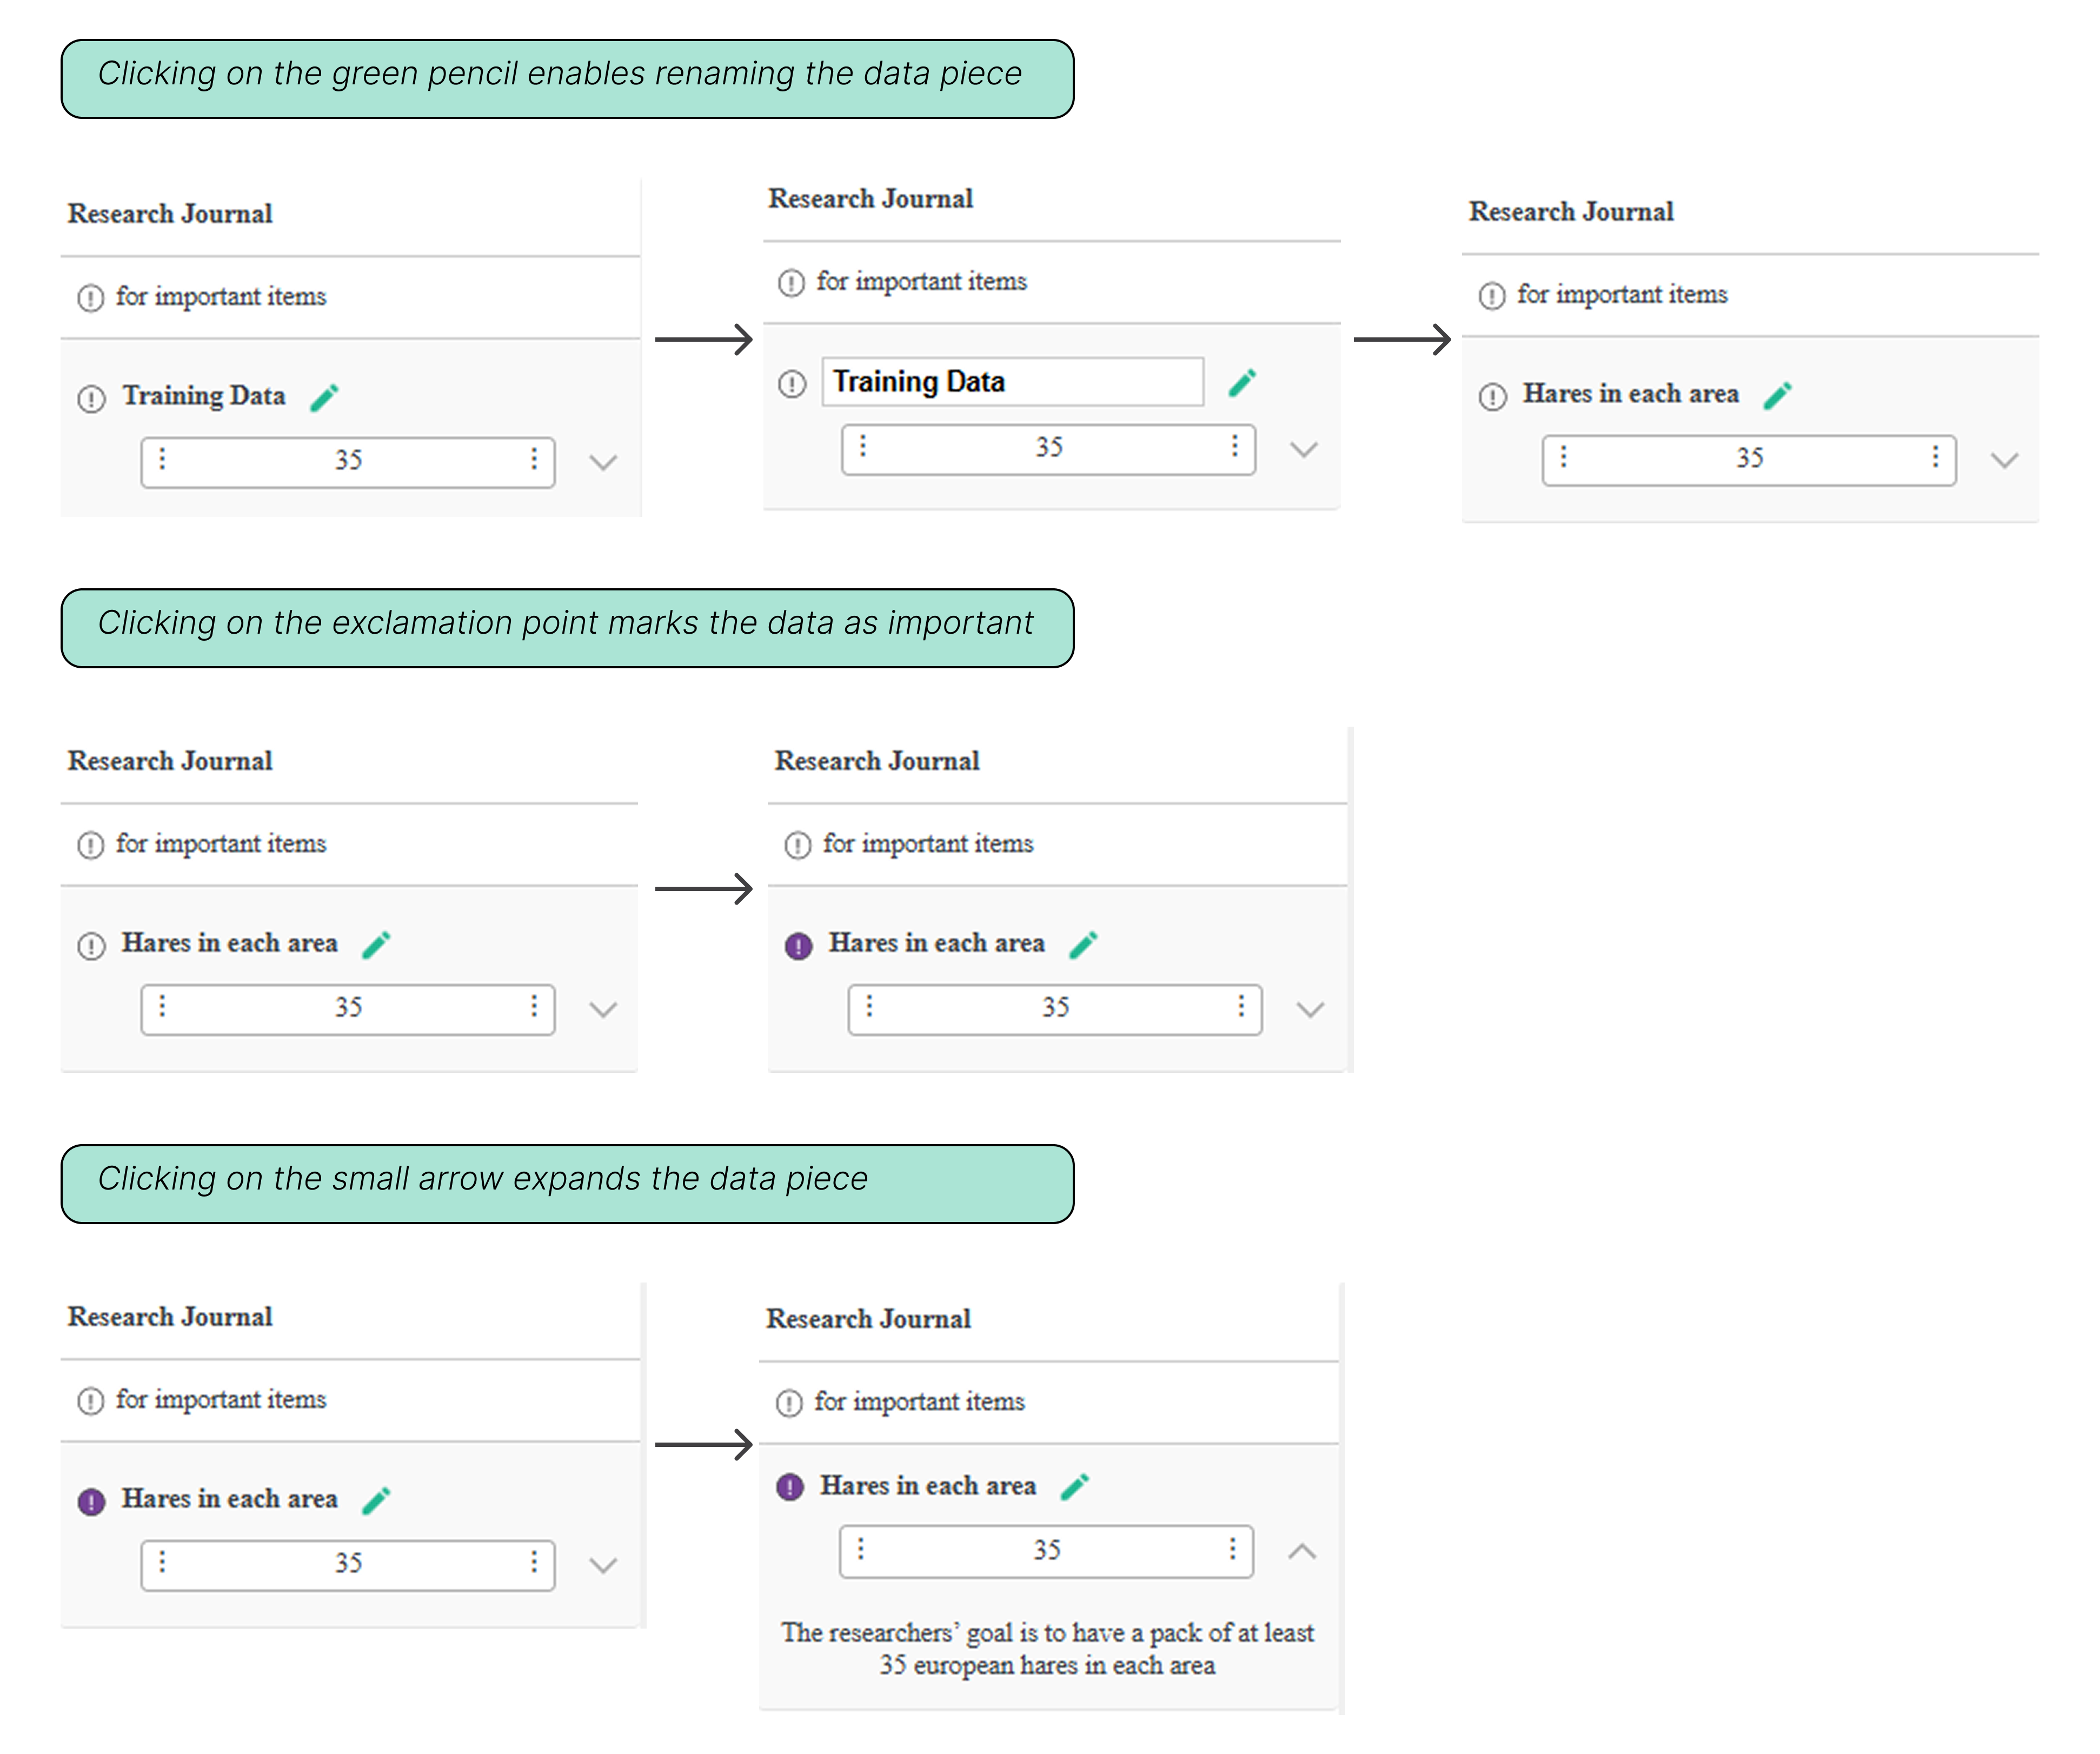
The Research Journal includes several features that can help you stay organized and work more efficiently in the game. These features include the ability to:
- Rename data pieces - When you move information into your research journal, it will automatically receive a title. However, the title isn't always clear. For example, the sentence "The pollution level has increased over the past five years at an average rate of 10% per year" might transfer in with a title like "Pollution Level Increase Rate". A more helpful title could be "Pollution rises 10% each year", because it clearly states the key information and makes the information easier to find later.
- Mark items as important - As your research journal fills up, it may be easy to lose track of which data points matter most. In this manner, marking items as important can help you quickly return to key details later.
- Expand data pieces to view more information - Some entries in the research journal can be expanded. If there is a small arrow next to a data piece, it can be helpful to click it and take a moment to read the additional details. If the expanded version includes the full content you need, you may not have to squeeze everything into the title. On the other hand, if this isn't the case, it's a good idea to use the title to capture the key information.
Integrate the Information as You Work
If the Investigation stage is about collecting data, and the Analysis stage is about calculating and answering questions, the Report stage is about integration. In this stage, you'll complete both a written and a visual report, and you'll need to present clear conclusions based on everything you've learned up till this point.
That's why it helps to integrate during the process, and not only at the end. If you actively think about how different data pieces connect in the Investigation stage, and if you connect your calculations to the bigger picture in the Analysis stage, the Report stage will feel much more straightforward.

Refresh Your Math Skills
During the study and the cases, you will have to answer numerical questions. Before the assessment, make sure you’re comfortable with percentages, ratios, averages, differences, and multi-step calculations. The game may require you to interpret data quickly and combine several figures to reach the correct answer, so being confident with these fundamentals will save you time and reduce mistakes. A quick review of core math concepts beforehand can make the game feel much more manageable. Practice tests are provided in our PrepPack.
Cases are Independent
The Cases stage stands on its own and does not build on what you did in the Study. In the Cases stage, you'll encounter a set number of cases, and each one is independent. The cases will usually include some brief study information, a visual representation (such as a table or a graph), and a question.
Keep in mind that because each case stands on its own, this stage is different from the Study stage, which builds gradually over time. This can often make the cases feel more manageable, as you have less information to hold in your head at once, and you don't need to plan ahead as much.
This also affects your time management. If you get stuck on one case and time is running out, remember that you don’t need that case to solve the next one. It may sometimes be beneficial to make your best guess, move on, and save time to earn points on the remaining cases.
Manage Your Time Correctly
Similarly to the Ecosystem Game, you will have 35 minutes to finish the RedRock Game. Since the assessment includes two stages – Study and Cases – it's important to manage your time correctly. It makes sense that the Study will take longer since it involves more planning, organizing, and integrating findings across sections. However, try to leave around 10 minutes for the Cases to ensure you have enough time for this stage as well.
Tips for the SeaWolf Game
In the SeaWolf Game, you will work through a simulation where you analyze microbial data to solve environmental challenges. Each site includes multiple stages that require careful evaluation of traits, conditions, and treatment rules.
You will need to follow specific selection criteria while working efficiently under a 35-minute time limit.
Let’s explore the key strategies to help you perform at your best.
Main Skills
- Optimization - When assigning microbes to sites, you must make decisions with incomplete information. Your goal is to optimize the microbial assignments as best as possible within the given constraints.
- Prioritization - Not every microbe will fit perfectly into each site. You'll need to prioritize the most important factors and be willing to compromise on perfection to meet the necessary ranges.
- Analytical Skills - Throughout the process, you must keep the algorithm in mind. Ensure the final attributes fall within the desired range, with at least one desired trait present and no undesirable traits.
Understand the Format
In the Sea Wolf game, your objective is to remove contamination from three different sites. For each site, you'll create a treatment made up of three microbes. To do this, you will go through four main stages per site:
- Select Attributes and Traits:
Each site is defined by three attributes (rated on a 1-10 scale) and two traits (one desirable trait and one undesirable trait). In this stage, you will choose characteristics (can be any combination of traits and attributes), which will affect later stages of the game. - Assign Microbes to Sites:
You will be shown microbes one at a time, along with the full characteristics of site 1 and partial characteristics of site 2. According to this information, you'll assign each microbe site 1, site 2, or return it to the pile if it doesn't fit either site. - Building a Prospect Pool:
You'll be presented with three microbes from the ones you previously assigned to site 1 and choose one to add to your prospect pool. You start with six microbes and then continue adding one at a time (each time choosing from three options) until you reach a pool of ten. - Finalize the Treatment:
From the ten microbes in your prospect pool, you'll select the final three that will be used as the treatment for that site.
Afterwards, you'll repeat the same process for site 2 and later for site 3.
The game will guide you through what to do in each stage. It is very important to read carefully and avoid moving too quickly through the instructions, as they are key to solving the game successfully
Understand the Algorithm
For a treatment to be successful it must follow three rules:
- Attribute Match: For each of the site's three attributes, the average score of that attribute across your selected microbes must fall within the site's required range.
- Desired Trait: Your treatment must include at least one microbe with the desired trait for that site.
- Undesired Trait: Your treatment must include no microbes with the undesired trait for that site. If any microbe has the undesired trait, your score is reduced.

Focus on the Average
Keep in mind that the attribute requirement is based on the average score of your three selected microbes, not on each microbe meeting the range individually.
For example, if an attribute needs to fall within 6-8 and you can't find three microbes that each land in that range, that's okay. A mix can still work as long as the average ends up between 6 and 8. You might use one microbe slightly above the range and another slightly below it to balance things out. Keep the average in mind when choosing your final three.
Manage Your Time Correctly
As with the other two Mckinsey games, you will have 35 minutes to build a treatment for all three sites. Keep an eye on the clock and aim to spend roughly one third of your time per site. It's normal for site 1 to take a bit longer while you get used to the flow, but make sure you still leave enough time for sites 2 and 3. This is a general guideline and your time split may vary. For example, you may spend less time on sites 1 and 3, and the longest on site 2, as long as you stay aware of the overall time and keep it balanced.
Conclusion
As we mentioned at the beginning, these assessments may look like games, but behind the engaging interface lies complex logic, structured evaluation criteria, and carefully designed scoring mechanisms. They assess far more than surface-level performance — from strategic thinking and data analysis to planning and decision-making under time pressure. Understanding the logic behind each game and approaching it with a clear strategy can make a significant difference in your performance
Our PrepPack includes in-depth explanations and practice for both the Ecosystem and RedRock games. Get ready with us to master these challenges!
Mika, Test Developer

Start Practicing Today!